 Plants While Away
Self-Watering Planter Buying Guide: The Features That Decide Whether It Survives Your Trip
Two planters sit side by side on a store shelf, both labeled “self-watering.” You buy one for your pothos and one for your fiddle leaf fig, then leave town for ten days. You come back to one plant that looks fine and one that is crisp and dropping leaves.
That happens a lot, because the label carries almost no useful information. It says nothing about how much water the planter holds, and nothing about how fast the soil pulls that water up. One pot might run dry in four days while another keeps a plant steady for two weeks, and the wording on both boxes reads the same.
These planters hold two separate spaces. Water sits in the bottom one, the reservoir. Soil and the plant sit in the top one, and the divider between them keeps roots out of standing water. Capillary action carries water from the reservoir up into the soil, the same effect that makes the wet line creep upward when a paper towel touches a spill. Soil and fabric both move water this way.
Two connection designs are common. A wick planter hangs a rope or strip of fabric down into the water. A false-bottom planter lets a column of soil dip through an opening and touch the water directly. Both move water, but not at the same speed, and that speed is a big part of how long your setup lasts.
Rather than a ranked list of the best pots, what follows is a feature checklist: reservoir size compared to pot size, water level indicators, overflow and drainage, and wick versus false bottom. It also covers which of your plants are good candidates and which ones are not, plus how to start using a new planter well before your trip instead of the night before.
No planter gives you a guaranteed number of days. Plant species, pot size, light, and indoor temperature all change how fast water leaves. The planter sets the ceiling; your conditions decide the rest.
- Reservoir capacity relative to pot volume: A stated reservoir size means nothing until you compare it to the amount of soil it has to keep damp. Estimate soil volume from the pot's inside width and soil depth, then weigh that against the reservoir. The bigger the plant and pot, the faster the same reservoir empties.
- Wick versus false-bottom delivery: A wick moves water slowly and steadily but depends on continuous contact with damp soil, so chunky bark and perlite mixes can stall it. A false bottom moves more water and rarely stalls, but keeps the lowest inch or two of soil wet the entire time.
- Water level indicator: A float gauge tells you how much water is left, not whether the soil is wet. Its real value is at home before you leave: fill the reservoir, read the indicator every few days, and you learn the drawdown rate for that plant in that room.
- Overflow and drainage provisions: Passive systems fail toward too much water more often than too little. Look for an overflow port, a removable plug, or open drainage holes so a heavy top watering has an escape route instead of pushing up into the root zone.
Two planters can carry the same "self-watering" label and run for wildly different lengths of time. What separates them is reservoir size measured against soil volume, how water travels from the reservoir into the root zone, and whether you can see the water level and send extra water somewhere safe. The picks below are examples of those features in practice, not a ranking: one is a graduated planter set with indicators and drainage, the other is a wick cord for converting a pot you already own. Compare them against your own plants, pot sizes, and trip length.

Fielda 8/10/12 Inch Self Watering Pots for Indoor/Outdoor Plants
A three-diameter set that shows the capacity-versus-pot-size tradeoff within one design: the same build in 8, 10, and 12 inch sizes, with a water level indicator and drainage holes already in place. Pair the smaller pots with modest root balls and expect the 12 inch pot holding a large leafy plant to empty its reservoir first.
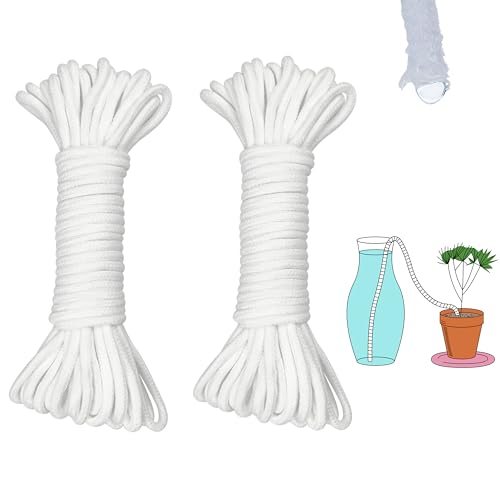
ORIMERC 60 feet 1/5 inch Self Watering Capillary Wick Cord Vacation Plant Sitter DIY Hydroponic Wicking Self-Watering Planter Pot Automatic Water System Device Potted Violet Auto Seedling Waterer Rope
The fix for a contact problem rather than a capacity problem. Cut it to length to build a water path from reservoir to root zone in a planter you already like, or add a second and third cord to a large pot where one trickle is not enough. Pre-soak the cord and water the soil from the top first, since capillary action only moves water between wet surfaces.
In this guide
Reviewed by — contributors with hands-on preparedness experience. How we test
Reservoir Capacity Relative to Pot Volume: The Number That Matters Most
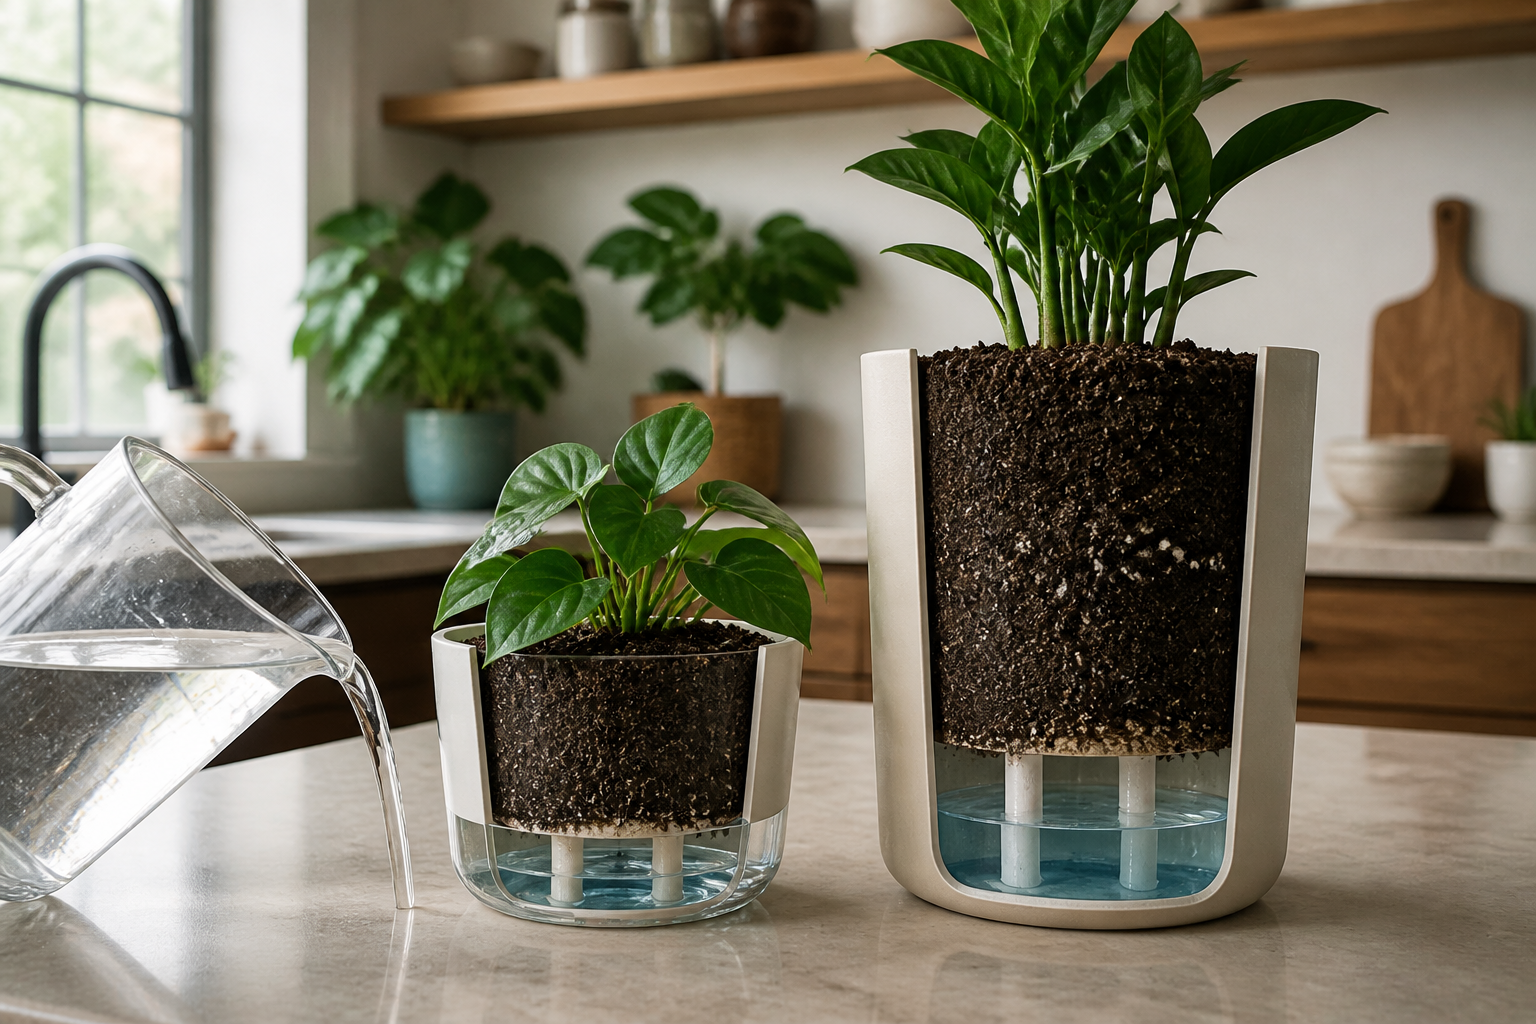
A listing that advertises a “large 1 liter reservoir” tells you almost nothing on its own, because reservoir volume only means something next to the amount of soil it has to keep damp. A big pot holds a bigger plant with more roots and more leaves, and that plant pulls water out faster. The same reservoir that runs for two weeks in a small pot may run dry in a few days in a large one.
The useful number is a ratio: soil volume on one side, reservoir volume on the other.
Estimating your soil volume
Two measurements get you close: the inside width of the pot across the top, and the depth the soil sits at.
For a round pot, multiply half the width by itself, then by the soil depth, then by 3. The result is cubic inches. A pot 8 inches wide with 7 inches of soil comes out near 336 cubic inches, and since one cup is a little over 14 cubic inches, that pot holds roughly 23 cups of soil. Exact numbers are not the goal. The size class is.
Now compare. If the reservoir holds about 4 cups and the soil holds about 23 cups, the reservoir is a small fraction of the root zone. That is normal. It just sets your expectations for how long it lasts.
When the listing gives no capacity
Many listings skip the number entirely. You can find it yourself once the planter arrives. Fill the empty reservoir with a measuring cup, counting as you pour, until water reaches the overflow point or the top of the fill line. Write that number down. Do this before you plant anything in it, while the pot is clean and dry.
Why “weeks without watering” claims are hard to use
Claims about going two or four weeks rarely say what plant, what pot size, what soil mix, or what room temperature they assume. All of those change how fast water leaves. Treat the claim as a hint, not a schedule.
Turn your own watering into a target
You already have better data than any listing. For two or three weeks, measure the water you give each plant with a measuring cup and note the amount and the date. Add up a typical week. If a plant drinks 2 cups a week and you will be gone 10 days, you need close to 3 cups of usable reservoir, plus a little extra for warm rooms. That number is your shopping target.
Wick Versus False-Bottom Designs: How Water Actually Gets Up to the Roots
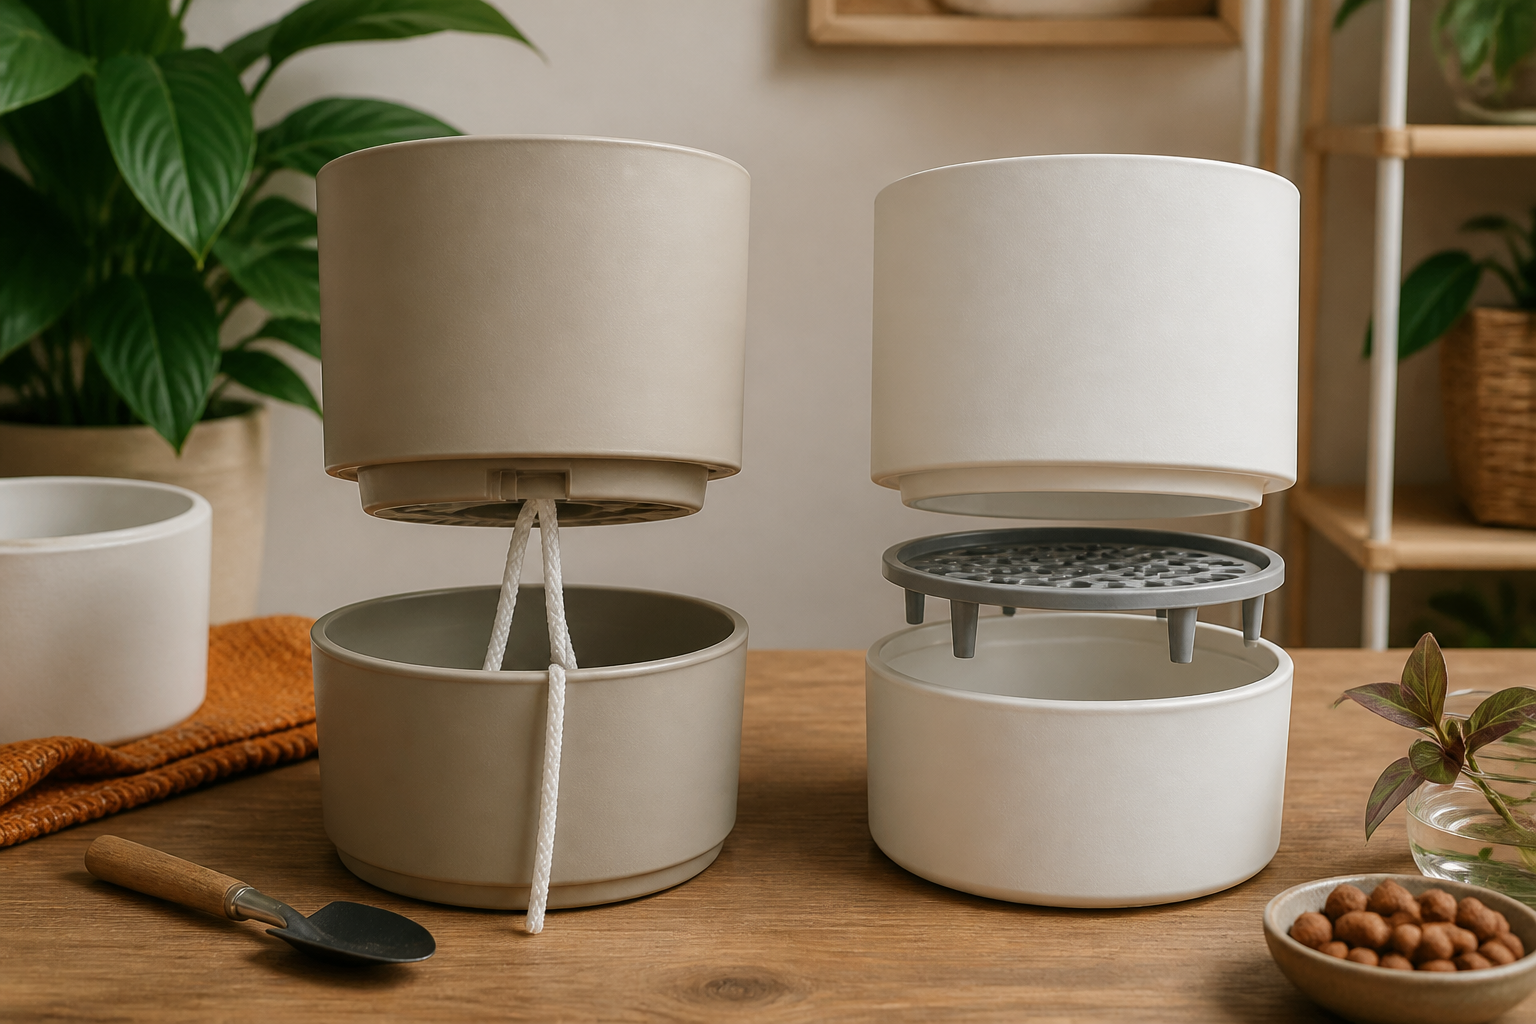
Every self-watering planter has to move water from the reservoir into the soil. There are two common ways to do that, and they behave differently when you are gone.
Wick designs
A wick is a rope or felt strip. One end sits in the water. The other end runs up into the soil. Water climbs the wick by capillary action, the same way a paper towel soaks up a spill. The soil pulls water from the wick as it dries, so delivery tends to be slow and steady.
The weak point is contact. A wick only works if the soil touching it stays slightly damp. If the top of the pot dries out hard, or the soil shrinks away from the wick, the chain breaks and water stops climbing. Chunky mixes with lots of bark or perlite make that more likely, because there is less fine material hugging the wick. You can also add a wick to a pot you already like using a capillary wick cord, which is useful if you want to test the idea before replacing planters.
False-bottom designs
A false bottom raises the soil on a platform above a water chamber. Some models have a soil column, a plug of potting mix that dips down into the water. Others use short legs or a mesh floor that sits in the reservoir. Water soaks upward through that contact point.
These move more water, and they rarely stall. The trade is that the bottom inch or two of soil can stay wet the whole time. Plants that want to dry out between waterings may sit in constant moisture longer than they tolerate. That is the main overwatering risk with passive systems, and it is why drainage and plant choice matter later in this guide.
Hybrid designs use a false bottom plus a wick or fabric pad. They aim for a middle delivery rate.
Neither design is better overall. Match it to your soil mix and to how dry your plants like to get.
Indicators, Overflow, and Drainage: The Three Features You Cannot Add Later
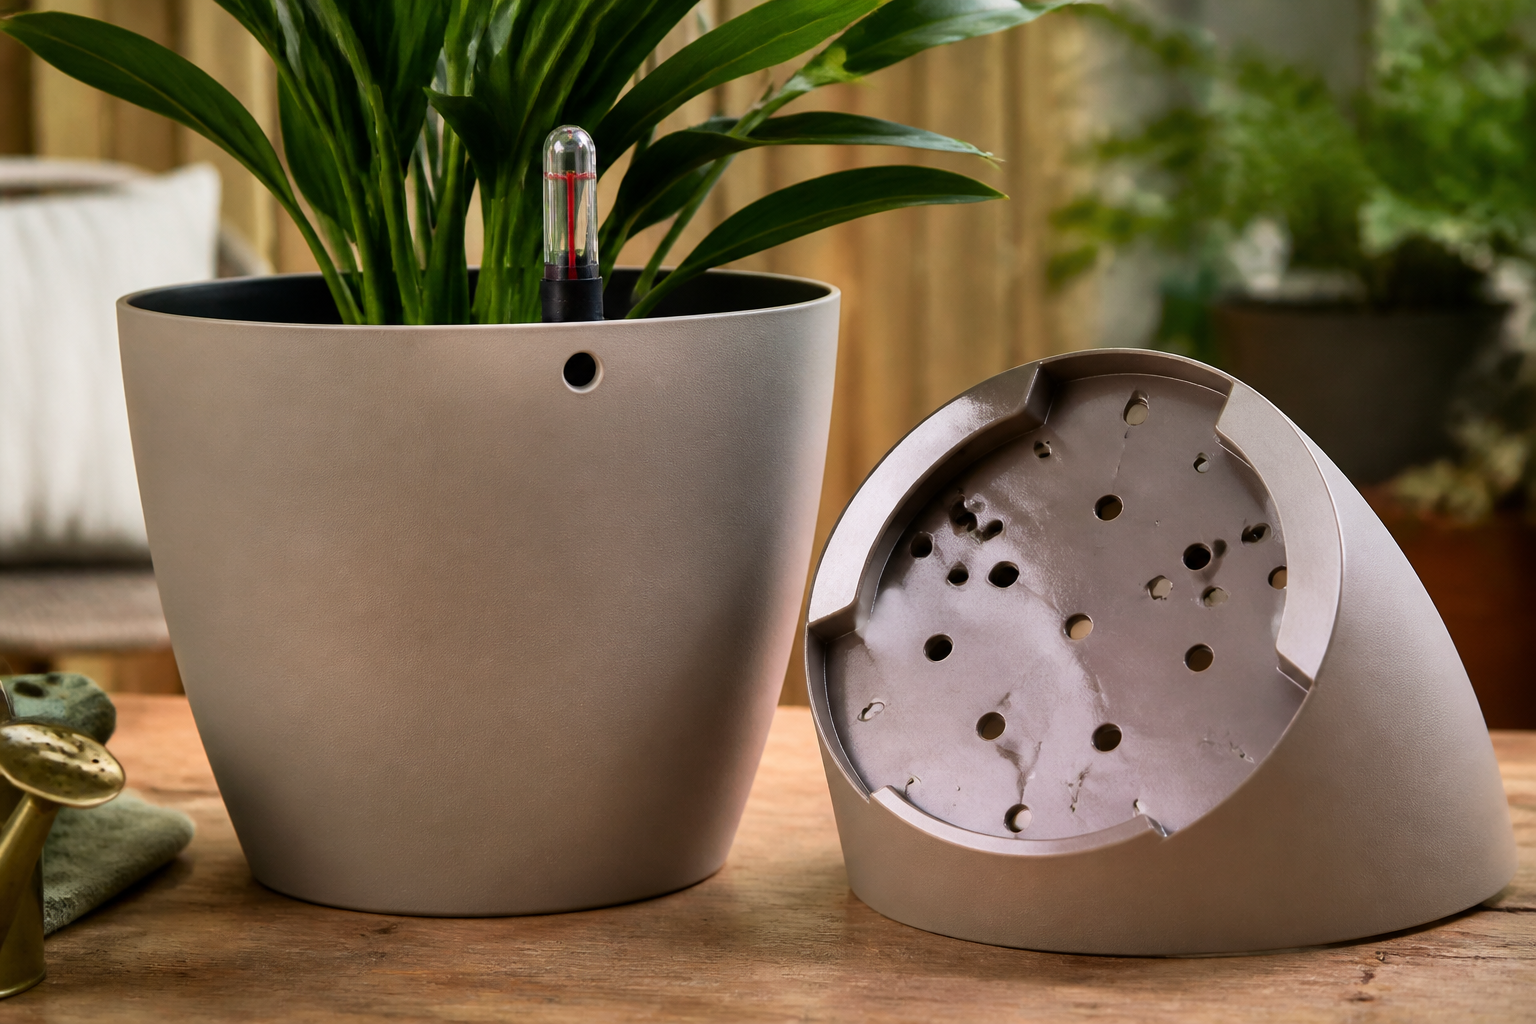
You can add a wick to almost any pot. You cannot easily add a window into a sealed reservoir, and you cannot drill a clean overflow port into a pot that is already full of soil and roots. Sort these three features out before you buy.
What a water level indicator really tells you
A water level indicator is usually a float on a stick. Water lifts the float, and a marker rises in a small tube or slot so you can see how much is left. That is all it does. It does not tell you if the soil is wet. It does not tell you if the wick is working. It tells you how fast the reservoir is going down.
That number is most useful before your trip, not during it. Nobody reads the gauge while they are away. But if you fill the reservoir, then check the indicator on day three and day six at home, you learn the drawdown rate for that exact plant in that exact room. From there you can estimate how long one fill lasts.
Cheap floats can stick to the tube or sink out of view. Test yours. Fill the reservoir, watch the marker rise, then pour water out and watch it fall. If it does not move smoothly both ways, treat the gauge as decorative and plan to lift the inner pot or use a wooden skewer to check the level instead.
Overflow and drainage are your safety valve
Passive systems fail toward too much water more often than too little. Soil that stays soaked loses air, and roots that sit without air are prone to rot. The fix is an escape route for extra water.
Look for one of three things: an overflow port near the top of the reservoir, a removable plug in the base, or a factory drainage hole you can leave open. The Fielda self watering pots list drainage holes along with a water level indicator, which is the pairing you want.
A fully sealed reservoir with no outlet is the risky one. Overfill it and the extra water has nowhere to go but up into the soil. For renters, drainage provisions also protect your floor. Water that leaves a plug on purpose lands in a saucer, not under your rug.
Verify all three before you pack
Fill it, watch the indicator move, then deliberately add a little extra and confirm where the overflow goes. Do that at the sink, two weeks out. Anything that leaks, sticks, or pools will show itself then, while you can still fix it.
Fielda 8/10/12 Inch Self Watering Pots: A Three-Size Set With Indicators and Drainage Holes
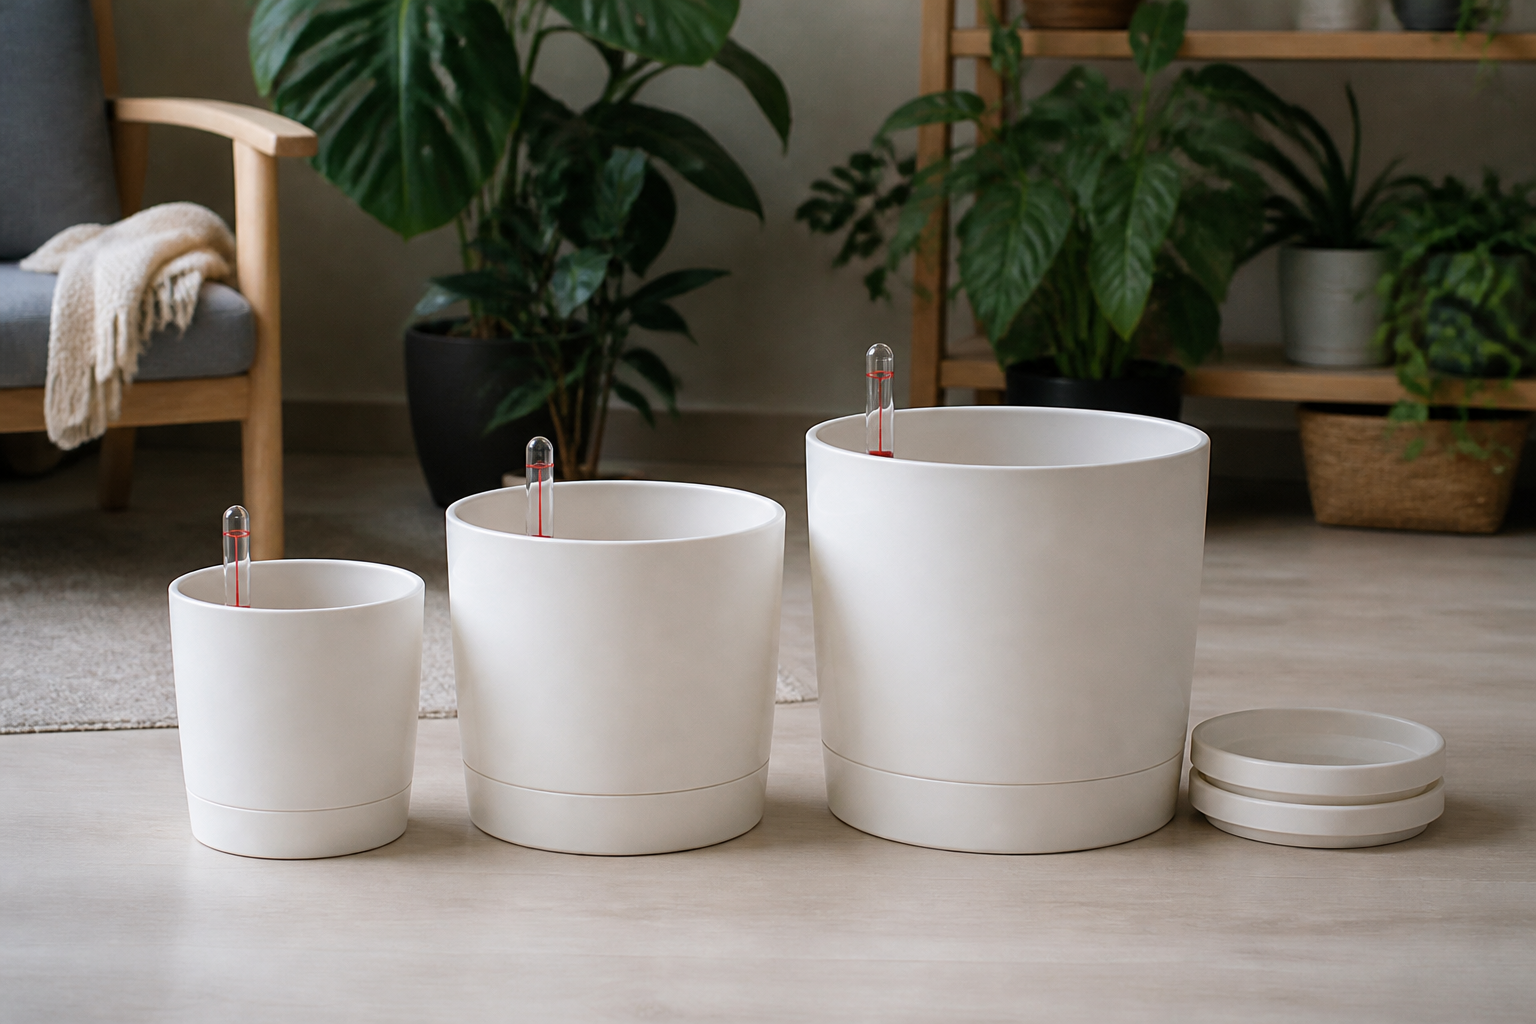
This set is useful as an example because it comes in three diameters at once: 8 inch, 10 inch, and 12 inch. That lets you see the point from earlier sections in one product line. The design stays the same, but the behavior changes as the pot gets bigger. Soil volume grows faster than reservoir volume does when a pot gets wider and deeper. So the largest pot in a set like this usually runs for fewer days per fill than the smallest one holding a thirsty plant, unless you pair each size with the right plant.
The listed features line up with the three things you cannot add later. The Fielda self watering pots include a water level indicator and drainage holes, and the product describes a deep reservoir. An indicator means you do not have to guess how much water is left the night before you leave. Drainage holes matter because a sealed pot has nowhere to send extra water if you overfill it or if a houseguest adds more on top.
Matching each size to a plant
The 8 inch pot suits smaller plants with modest root balls, like pothos, small philodendrons, or a young peace lily. The 10 inch pot fits a plant that has outgrown a nursery pot but is not yet large. The 12 inch pot is for bigger root systems. Keep in mind that a large leafy plant in the 12 inch pot will drink the most, so it is the one most likely to empty its reservoir first.
What to check when it arrives
Before you repot anything, do three quick checks. Move the indicator by hand or with water and watch whether it rises and falls smoothly. Look at where the drainage holes sit, since holes at the very bottom behave differently than holes set above the reservoir line. Then find the fill opening and make sure you can reach it with your watering can once the plant is in place and sitting where it lives.
A matched set helps when you are moving several plants at the same time. Repotting is a change for each plant, so plan that work for weeks before your trip, not the night before.
ORIMERC Capillary Wick Cord: For Converting or Supplementing a Planter You Already Own
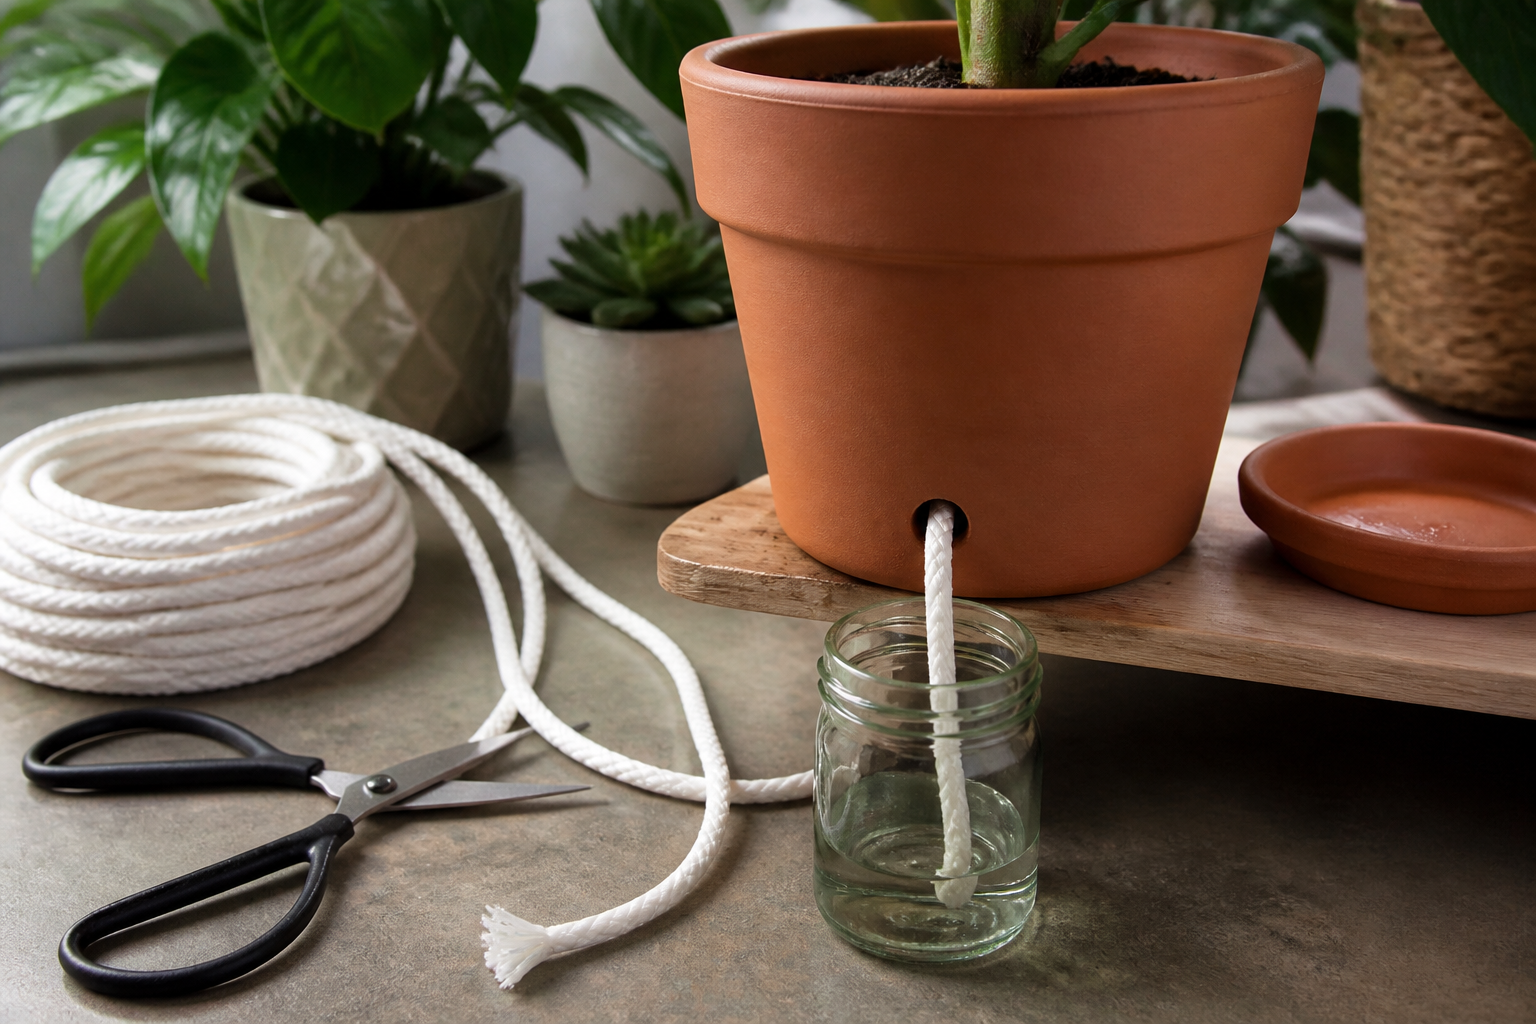
A wick is just a cord that pulls water upward by capillary action. It is the working part of any wick-design planter. If your planter uses a false bottom instead, and the soil above it is not staying moist, a wick is the cheapest way to build a real water path between the reservoir and the root zone.
ORIMERC 60 feet 1/5 inch Self Watering Capillary Wick Cord Vacation Plant Sitter DIY Hydroponic Wicking Self-Watering Planter Pot Automatic Water System Device Potted Violet Auto Seedling Waterer Rope
Check Price on AmazonThe ORIMERC capillary wick cord comes as a long spool of 1/5 inch cord that you cut to the length you need. That matters, because wick length is not one size fits all. One spool can serve several pots at once.
Length, count, and contact depth
Three things control how fast a wick moves water.
Length. The cord has to reach from the bottom of the reservoir, up through a drainage hole, and several inches into the soil. Longer runs move water more slowly. Keep the path as short and as straight as you can. Avoid loops that rise above the soil line, since water will not climb uphill past a high point.
Number of wicks. One cord delivers a small, steady trickle. Two or three cords in the same pot deliver more. Large pots and thirsty plants usually need more than one.
Contact depth. The cord end must sit on the floor of the reservoir, not float near the top. As the water level drops, a short cord loses contact and delivery stops. Tuck the soil end down into the root zone, not just under the surface mulch.
Pre-wet the cord and the soil
A dry wick does not start on its own. Soak the cut cord in water until it is fully wet before you install it. Then water the pot normally from the top so the soil is already moist. Capillary action moves water between wet surfaces. Dry soil breaks the chain, and dry potting mix can repel water instead of absorbing it.
When a wick is the right fix, and when it is not
Add a wick when the planter holds enough water but the water is not reaching the roots. That is a contact problem, and a cord solves it.
Do not add a wick when the reservoir simply runs dry too soon. More cords drain a small reservoir faster. That is a capacity problem, and the answer is a bigger reservoir, a smaller plant, or a shorter trip.
Either way, set it up at least two weeks before you leave and watch what the soil does.
Which of Your Plants Belong in a Self-Watering Planter, and How to Phase Them In
A reservoir keeps water available all the time. That is good news for some plants and bad news for others. Sort your collection before you buy anything.
Good candidates
Plants that like soil to stay evenly moist are the best fit. Think peace lily, calathea, fern, spider plant, pothos, and many begonias. These plants sulk when soil dries out fully, so a steady supply from below matches what they already want.
Marginal candidates
Many aroids, like monstera and philodendron, sit in the middle. They tolerate steady moisture, but they are often potted in chunky mixes with bark, perlite, or coco chips. Those mixes drain fast and do not pull water upward well. A false-bottom planter can leave the top half of that pot dry while water sits below. If you want to use a chunky mix, add a wick so there is a continuous path from the reservoir into the root zone. A cut length of capillary wick cord can bridge that gap in a pot you already own.
Poor candidates
Succulents, cacti, snake plants, ZZ plants, and most other dry tolerant species are usually a bad match. They store water and expect the soil to dry out between drinks. Constant moisture at the roots works against them. For a trip, these plants are often fine with a deep watering before you leave and nothing else.
Repot first if roots fill the pot
A plant that is heavily root bound has very little soil left to hold or move water. A reservoir cannot help much when there is no soil path for water to travel. If roots circle the pot or push out the bottom, repot into fresh mix before you expect a self-watering planter to do anything useful.
A phase-in timeline that actually tells you something
- Four to six weeks before your trip, transplant into the new planter. Water from the top for the first week or two so new roots grow down toward the reservoir.
- Fill the reservoir and mark the date.
- Track how long it takes to empty. Note the indicator reading every few days.
- Refill and repeat for a second full cycle.
Two cycles give you a real run rate for your light, your heat, and that specific plant. Measure first, then book. If the reservoir empties in five days and your trip is ten, you know now instead of later.
How to Choose: A Feature Checklist for Your Specific Trip
Work through these decisions in order. Each answer narrows the next one.
Step 1: Write down your trip length
Count travel days, not nights. A Friday to Sunday weekend is short. Ten days is a different problem. Your planter has to cover the longest gap between the last time you water and the first time you get home.
Step 2: List your plants and their thirst level
Group them into three buckets. Thirsty plants that wilt fast, steady plants that like even moisture, and plants that prefer drying out between drinks. Only the first two groups belong in a self-watering planter.
Step 3: Note the pot size each plant is in now
Self-watering planters come in set sizes. Measure the diameter of your current pots so you are matching, not guessing. A three size set like the Fielda 8, 10, and 12 inch pots covers the common indoor range in one purchase.
Step 4: Set your reservoir target
Bigger reservoir relative to pot volume means more unattended days. If the reservoir looks small next to the soil mass, plan on a shorter run or a different method.
Step 5: Confirm the three features you cannot add later
A water level indicator so you can see what is left. An overflow hole so a heavy top watering has somewhere to go. Drainage so roots are not parked in standing water.
Step 6: Decide if this is the wrong tool
Self-watering planters are not the answer for every trip. Skip them when:
- Your absence runs past what any reservoir on hand can cover
- You have a large collection and would need to buy and phase in many planters at once
- You own plants you would be upset to lose, including mature or rare specimens
In those cases a plant sitter is the more reliable plan. Leave written instructions, not verbal ones.
Step 7: Mix methods instead of standardizing
You do not need one system for everything. Put your thirstiest plants in self-watering pots. Leave the drought tolerant ones alone. Use a wick setup where a planter swap does not make sense.
Try these first, with no purchase
- Water deeply the morning you leave, until water runs out the drainage hole
- Group plants together, away from heating and cooling vents
- Move them back from the brightest window to slow water use
- Run a test week at home and watch how fast the soil dries
That test week tells you more than any product page. You can print this page and check the steps off as you go.
Frequently Asked Questions
Should I fill from the top or from the reservoir port?
Use the port once the plant is settled. Filling from the top soaks the soil and can wash fine particles down into the wick or the false bottom, which slows water movement over time. The exception is a brand new planter. Water from the top for the first few weeks so the roots keep growing down toward the reservoir.
Do I still water the surface after I switch?
Less often, but not never. Roots near the top of the pot stay dry when all the water comes from below. A top watering every few weeks keeps that upper layer from turning hard and dusty. It also rinses salts out of the mix, which matters more in a pot that drains slowly.
How long should the reservoir sit empty between refills?
Give it a day or two of dry time before you refill. A reservoir that is always full keeps the bottom of the soil wet with no break, and constantly wet soil is where root rot starts. The indicator helps here. When it reads empty, wait, then fill. That short gap also lets air back into the lower soil.
Can I put fertilizer in the reservoir?
It is safer not to. Fertilizer in standing water can build up as salt in the lower soil, and you cannot flush it out through a reservoir. Feed from the top instead, with water that runs through and out the drainage hole.
What if the planter has no drainage hole at all?
Then you are responsible for every drop. Fill the reservoir below the marked line, never to the brim, and skip these pots for plants that hate wet feet. Before a trip, a no drainage planter is the one most likely to drown a plant if someone tops it up or if the soil wicks faster than you expected.
How do I tell if run time has changed with the season?
Track refills. Note the date each time you fill, for a few cycles. In warm, bright months plants drink faster and the reservoir empties sooner. In winter the same pot may stretch much longer. Use the current season’s refill interval, not last summer’s, when you plan your trip.
Your Next Step Before You Book
You do not need to buy anything today. You need four numbers and two weeks of lead time.
1. Measure the pots you plan to convert. Use a tape measure on the inside diameter at the soil line, then the depth of the soil from the surface down to the bottom. Write both numbers down next to the plant’s name. Do this for every plant you are thinking about moving.
2. Estimate the soil volume. Multiply the diameter by the diameter, then by the soil depth. Multiply that result by 0.6, since most pots taper toward the bottom. That gives you rough cubic inches. Divide by 231 to turn it into gallons. A pot holding about a gallon of soil is a very different job than one holding four.
3. Compare your logged water use to candidate reservoir capacities. If you have been tracking how much water each plant takes each week, add up the plants you want to convert. Then look at the stated reservoir capacity of any planter you are considering. If your weekly total is close to or larger than the reservoir, that planter will not carry your trip on one fill. Look at a larger size tier, split the plant into two pots, or use a different method for that plant.
4. Run two full refill cycles before you leave. Set the planter up, fill the reservoir, and watch how many days it takes to empty under your normal light and room temperature. Then fill it again and repeat. Two cycles tell you far more than one, because the soil is fully settled and wicking the second time around. Start this at least three or four weeks out so you still have time to change course.
If you are converting a pot you already like, a capillary wick cord lets you test the wicking idea first. If you want planters built with indicators and drainage already in place, a graduated set like the Fielda three-size pots covers small and medium plants in one go.
The measuring steps and the checklist earlier in this guide are all you need for the math. Print this page and fill in your numbers plant by plant, then book your trip knowing which pots are covered and which still need a plan.
Sources and Further Reading
- Meet the Self-Watering Pot That Helped Me Stop Killing My …
- Best self watering planters? : r/houseplants
- Self-Watering Planters and Pots: Complete Guide
- What are the best self-watering pots for small spaces?
- Self-watering pot House Plants at Lowes.com
- What is the best self-watering system for indoor plants?
- Self Watering Planters - Indoor & Outdoor Self Watering Pots
- What is the best self-watering pot for indoor plants?
- TOPBATHY Pots for Indoor Plants Watering Flower Planter …
- What is the best self-watering pot for indoor plants?
- Self-Watering Planters and Pots: Complete Guide
- Self Watering Pot
